
This drill will teach you how to set up with the perfect stance width, weight distribution and golf ball position every time.
It will provide a solid foundation upon which to rotate your body — as explained in Golf Swing 102a – Setup: The Perfect Golf Stance Width, proper stance width is vital for power, accuracy, consistency and injury prevention.
This drill will also help you to become a better, more consistent ball striker — we saw in Golf Swing 102b – Setup: The Perfect Golf Ball Position that the correct ball position will enable you to achieve clean, solid contact every time, avoiding the fat or thin shots that plague most golfers.
Finally, as described in Golf Swing 102c – Setup: The Perfect Golf Weight Distribution and Balance, this drill will show you how to achieve perfect balance in your setup, so that you can be centred and anchored to the ground for power and stability throughout the golf swing.
Create a Practice Station
You’ll need a place to practise, about 40” (1m) square, where you can draw marks on the ground — this could be an A0 piece of paper, an exercise mat, an old piece of carpet, or perhaps the driveway outside your house.
As usual, these instructions are given for a right-handed golfer, apologies to the lefties out there.

Figure 1. Practice Station for Stance Width and Ball Position
Mark a straight line approximately 3 feet (90cm) long, pointing at a distant fixed target, such as a telegraph pole. We’ll call this the target line.
Take your standard posture by performing Golf Swing Drill 101 – Setup: Perfect Posture and Connecting to Your Core in full, while standing with your toes about 2 feet (60cm) from the target line, with your toes, heels, knees, hips and shoulders parallel to the target line.
Mark the positions of the insides and the backs of your heels, and the tips of your toes.
Draw a straight line through the point marking the inside of your left heel, perpendicular to, and intersecting, the target line. Draw another line, parallel to that one, through the point marking the inside of your right heel.
Mark a golf ball sized circle with its right side level where the left heel line intersects the target line. This will be the position of the back (right side) of the ball (see Figure 1).
Draw another line, parallel to the target line, through the points marking the backs of your heels, and another parallel to that through the points marking the tips of your toes (the toe line).
Draw 2 more lines, parallel to your heel lines and perpendicular to the target line, 2 golf balls (3.36” / 8.5cm) outside your heel lines.
Your practice station should look something like that shown in Figure 1.
Create Your Setup and Alignment Sticks
Using the lines marked on your practice station, use a permanent marker to make three corresponding marks on an alignment stick – one for the position of the inside of each heel (the second, outer heel lines on your practice station), and one for the back of the golf ball.
For an adult male of average build, the heel marks will be approximately 12” (30cm) apart. The ball mark will always be 2 golf balls (3.36” / 8.5cm) inside the left heel mark.
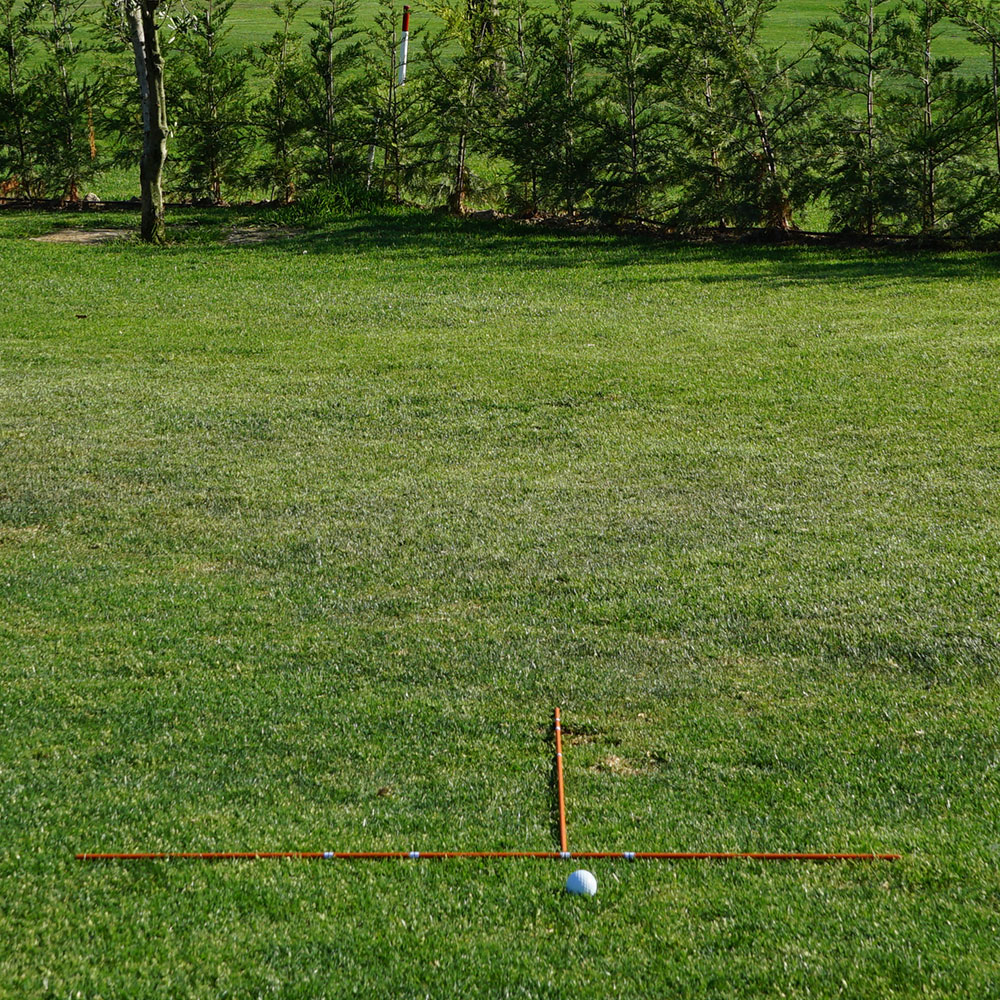
Figure 2a. Golf Setup and Alignment Sticks

Figure 2b. Golf Setup and Alignment Sticks in Use
During your practice and range sessions, place this marked alignment stick on the ground, parallel to the target line, about 3” (8cm) inside the golf ball. Place a second alignment stick perpendicular to the first, level with the ball mark – see Figure 2a.
Note that in Figure 2a there is a forth mark, 5″ to the right of the right heel mark, this is the position of the inside of the right heel for the driver setup – see Golf Swing 109 – Setup: How to Set Up for the Driver.
Now, when you practise, you will be able to precisely check your alignment, your stance width, and your ball position. When you correctly address the ball, the inside of your heels will be level with the outer marks, and the back (right) edge of the golf ball will be level with the ball mark and the second stick – see Figure 2b.
Keep these setup sticks with you and use them in every practice session.
The Drill
Get yourself in the “learning zone”. Be alone. Clear your mind. Focus. Concentrate intently on the feeling of your body as you perform the drill.
Step into your practice station with your left foot first, aligning the inside of your left heel with the back of the ball (the inside left heel line), and the tip of your left shoe with the toe line.
Be very conscious of the fact that the inside of your left heel is level with the back of the golf ball.
Now bring your right foot into the practice station, level with the inside right heel and toe lines.
Carefully go through Golf Swing Drill 101 – Setup: Perfect Posture and Connecting to Your Core in full. Feel connected, balanced.
Check that the inside of your heels are on the heel lines, and your toes still on the toe line.
Check that you are aligned parallel to the target line — your toes, heels, knees, hips and shoulders. Look at the target that your target line is pointing to, concentrate on how your body feels; this is what being aligned to that target feels like.
Once more, rock gently onto your toes, and then back onto your heels. Do this 5 times, and then settle over your ankles. Repeat with your eyes closed, be acutely aware of your body, of the sensations as your balance shifts, feel yourself balanced over your ankles as you relax into a neutral position.
Now move your right foot out 2 golf balls, onto the outside right heel line. Settle your weight evenly over your ankles, stand tall, and feel connected. Focus again on the golf ball position. Where is it relative to your body, to your left ear, what does that feel like?
Again, rock gently onto your toes, and then back onto your heels. Do this 5 times, and then settle over your ankles. Repeat with your eyes closed. Focus intently on how your body feels.

Figure 3. Perfect golf stance width and ball position.
By rolling your ankles outwards, moving your knees as little as possible, shift your weight all the way to the outside of your feet. Now roll your ankles inwards, again keeping your knees as still as you can, so that the weight is on the insides of your feet. Rest with your weight shifted slightly to the inside of your ankles. Repeat this 5 times with your eyes open, then 5 times with your eyes closed. It is vital that this movement comes from your ankles, not from your knees. As always, focus on and soak up the sensations from your body. Feel the pressure on the insides of your ankles, pushing down slightly onto the insides of your shoes. When you finish, with your weight on the insides of your feet, notice how you feel anchored to the ground, you feel solid, balanced, stable. Feel the slight tension on the inside of your thighs as they engage; you should feel your glutes engaging too.
Run through your posture check. Your stance is now wider, but you’re still standing tall, ears reaching for the sky. Your core is activated, your abdominal muscles are pulled in and up, your shoulders are connected. You feel solid, connected, and alive. With your golf stance width, your weight evenly distributed between the insides of your feet, balanced over your ankles, you feel anchored, stable, and able to drive your weight into the ground.
Close your eyes and focus on how your body feels.
Now open your eyes and focus on the golf ball position, feel it, visualise being in this position ready to address the ball. Burn that image into your mind.
Be aware of your alignment, your joints parallel to the target line. Look at the target, being careful not to turn your shoulders even slightly, feel how your body is aligned, this is what perfect aim feels like.
Feel How it Works
Shift your weight mostly to the right, while keeping it on the inside of your right foot. Feel how easy it is to shift your weight without moving your upper body. Then shift your weight over to the inside of your left foot. Again, you don’t need to sway. Feel how stable your hips are when you shift your weight.
With your weight over the inside of your left ankle, reach over with your right hand as if to shake someone’s hand who is standing to your left. Feel your hip joint move directly over your left ankle. Feel how easy it is to turn around your left hip if you keep your weight over your ankle. You can shift your weight and pivot without swaying your upper body to the left.
Feet Parallel
Throughout this drill, your toes and knees should be pointing forward, your feet parallel.
If you suffer from restricted hip mobility, then you can turn your left foot out slightly, at most 30 degrees, which will help you to turn into the follow-through while still in balance.
You should never turn your right foot out. You may have been told that this will help you make a full turn on the backswing, but helping the hips to turn more is counterproductive — much of your power will come from the separation between your hips and shoulders during the backswing, which we’ll discuss in detail in later articles.
If you do decide to turn your left foot out, then do it after you have addressed the ball, not as part of this phase of the setup, and make sure that your heels remain parallel with the target line.
Progressing
Repeat this drill as often as you can, at least once a day for a month, and then regularly thereafter.
As you progress, try stepping into your practice station with your eyes closed, and then check that your stance width is correct. If it’s not correct, why not? How does it feel? Correct your position, how does that feel different?
Try the drill while looking only at the target, then check to see if your stance width is correct and that your joints are aligned parallel to the target line. Estimate your error before you check it, feel the difference between what you’re doing and the correct position.
Perform the drill regularly while using a real golf ball, rather than just a mark on the ground. Try the drill while looking only at the ball. Check your alignment. Check your stance width. Estimate it. Feel it.
After about a week, you should start to perform the drill without your practice station, relying only on what feels correct. Check your position very carefully when you first try this, measure your stance width and compare it to your practice station. Measure the distance between the ball and your left heel. If it’s not correct, why not? How does it look different? How did it feel different? Make sure that you still use your practice station occasionally as a “reality check”, but rely on it less and less until you can trust your feel.
Once you are confident that you can perform the drill perfectly, start to combine it with Golf Swing Drill 103 – Setup: Perfect Golf Spine Angle. Don’t rush though; you’ll progress faster and more successfully if you focus on perfecting each step individually before building on it. You should be constantly reaching, building, but if you start to make mistakes then step back to the drill that will fix those errors and work forward again from there. Don’t neglect Golf Swing Drill 101 – Setup: Perfect Posture and Connecting to Your Core, continue to include it into your practice regime, it is the first level of the foundation you are building, one drill on top of the next, for a truly great golf swing.
After about a month of performing this drill, the perfect stance width and ball position should be automatic, even small mistakes should “feel wrong”. Keep performing the drill daily until you get to this stage.
Continue to perform this drill regularly for as long as you play golf. Small errors can easily creep in, without you noticing, unless you check regularly. If you don’t catch them quickly, these small errors can quickly spread, causing damaging compensations and manipulations throughout your swing.
The best golfers in the world check their basic setup very regularly, so should you.
Quick Drill
- Take your basic posture, ankles directly under your hip joints, feet parallel, with the inside of your left heel level with the right side of the golf ball;
- Move your left foot outwards 2 golf balls. You should now have a gap of 1 golf ball between the inside of your left heel and the left side of the golf ball;
- Move your right foot outwards 2 golf balls;
- Make sure you are balanced with your weight on the insides of your ankles.
If you have any questions or comments about this or other articles on Golf Loopy, please send us an email.
Next up: Golf Swing 103 – Setup: Perfect Spine Angle.