In this second part of the Lag and Release Timing series, we give you a great drill for feeling how to maintain lag from the top of your golf swing and avoid an early release of the golf club.
If you missed Part I, you can view it here.
We’ve already discussed how an early release of the golf club, where the angles between the club shaft and the forearms increase too early and the club works out away from you in the downswing (also called “casting” or “throwing away lag”), will create a swing path that is too shallow and presents too much loft to the golf ball, resulting in a high, weak ball flight, lack of compression (reduced efficiency of strike), poor striking (“fats” and “thins”) and a dramatic loss of distance.
This early release can be caused by a number of swing faults – most commonly being over active with your upper body early in the downswing, and thus creating angular momentum that throws the club out away from you, uncocking your wrists too early, and/or straightening your trail arm too early.
Before we work on the drill, let’s try to build a deeper understanding of how a great golf swing works.
The Golf Swing Has TWO Low Points
All golfers are aware that the golf club swings through an arc, and that the club head reaches its lowest point at the bottom of that arc.
You probably also know that, for a well struck golf shot (with any club other than the driver), the low point of the club head (the bottom of the swing arc) should be after, on the target side of, the golf ball.
The club head should be moving downwards through impact (a negative angle of attack), striking the ball first and then descending into the turf, taking a divot after the ball before rising up again on its graceful arc.
This results in forward shaft lean at impact, reducing the loft and creating more compression (an efficient transfer of energy to the ball), and a lower, more penetrating ball flight. More distance, more consistency, and more control.
All good golfers do this – it may be very shallow, but every great ball striker takes a divot after the ball with their irons.
Almost all average golfers create a swing arc that bottoms out before the ball, resulting in poor contact. They will either hit the ground before the ball (hitting it “fat”), or strike the ball slightly on the upstroke (hitting it “thin”). Either is horrible!
Even if the ball is struck at exactly the low point of the swing arc (which is far more difficult, requiring superhuman precision to do consistently – striking the ball on the way down gives you a much wider margin of error), then it will still be what we regard as slightly “thin”, the ball will be struck low on the club face, resulting in a loss of ball speed and thus distance.
The Other Low Point
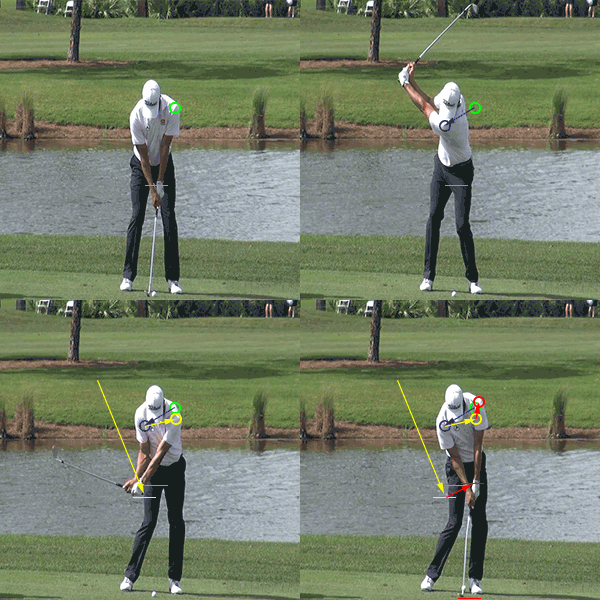
What many golfers don’t fully understand is that there is another, critically important, low point in the golf swing; the low point of the butt end of the club, which should happen just before the club is released into impact, when the hands pass the trail thigh – see Figure 1.
It is this other low point that enables you to lag and release the club properly for maximal club head speed and control through impact.
Where the low point of the club head must be after the ball, the low point of the butt end of the club must be just before the ball.
From this point, in front of the trail thigh, the butt end of the club then works back up as the club is released into impact – the lead shoulder pulling the grip up as it rotates upwards and backwards around your tilted axis, and you drive into the ground through your lead leg, using the ground to generate more speed through impact.
Many golfers have been taught that they need to “hit down” on the golf ball, but this can be very misleading!
Yes, the club head should still be moving slightly down in its arc at impact, as described above, but the concept of “hitting down” causes golfers to try to move everything down through impact, lunging down with their upper body in an effort to drive the whole golf club downwards.
This then forces the subconscious to try and rescue the swing. If you released the club properly from here you’d strike the ground way behind the ball and take a divot the size of a badger!
Your subconscious will force you to buckle your lead arm and extend (cup) your lead wrist in an attempt to shallow out the swing and miss the ground, creating the dreaded “chicken wing” look and “flipping” the club weakly through impact.
Alternatively, you’ll try to hold onto the lag for too long in an effort to strike the ball before the ground, inefficiently pushing the golf club at the ball and not fully releasing the club through impact, creating a swing that is too steep and not turning all that lovely lag into club head speed. This swing will feel like very hard work – lots of effort for little reward.
So, let’s work on a simple drill that gives us the feelings of creating these two low points correctly, and thus build a much more efficient and effective golf swing!
The Drill
As always, apologies to our leftie friends, but for simplicity these instructions are given for the right handed golfer.
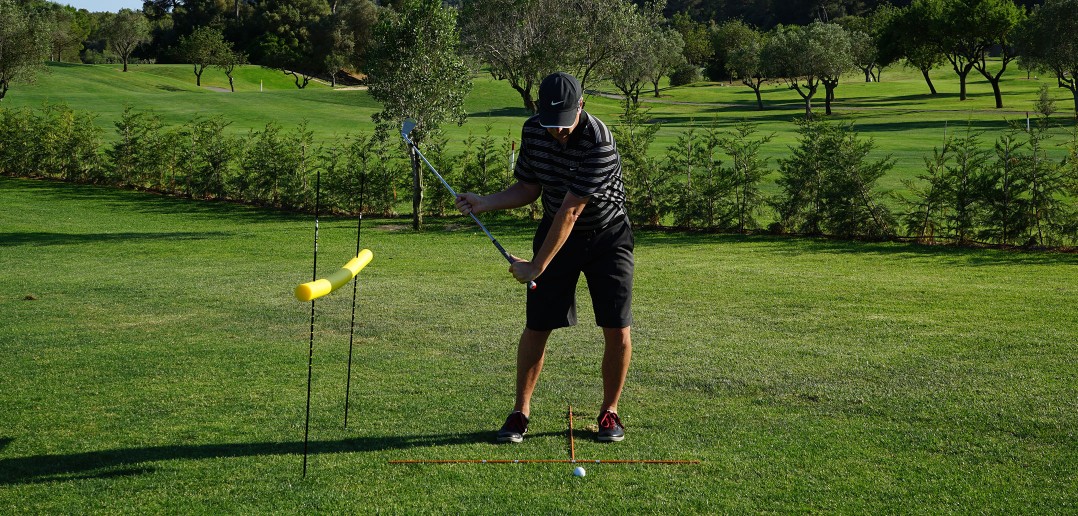
Start with the same practice station that we used in Part I – with our setup sticks in place and a pool noodle “hurdle” exactly one club length behind the ball.
Place a ball just outside the normal ball position, so that you won’t strike it as you practise, and take your normal address position.
As before, lift the club so that you can rest it lightly on the noodle – see Figure 2. You won’t be able to make your normal takeaway, the noodle will be in the way, but move into the correct takeaway position, lifting your hands slightly and turning your shoulders, keeping your arms straight and your left ear level with the back of the ball.
Now swing to the top and pause – see Figure 3. Slide your right hand about halfway along the shaft and grip it lightly – see Figure 4.
Keeping your left wrist flat, but still soft and loose, pull gently with your right hand to encourage the shaft towards your right shoulder. Don’t pull hard, that would just serve to ingrain the feeling of pushing against the club with your left hand, which would be counterproductive.
Keeping your left arm straight but relaxed, your left wrist flat but super-soft, continue to pull the club shaft gently towards your right shoulder as you pull your left arm down across your chest, moving your left hand down in front of your right thigh as you shift left and back with your left hip – see Figure 5. Keep your left ear level with the back of the ball as your left shoulder works down around your tilted axis.
Pause and slide your right hand back to take your normal grip again, moving your right elbow in front of your body – see Figure 6. This is the low point of the butt end of the club.
Now swing through, your left shoulder and hip lifting as you rotate your shoulders and straighten your left leg – see Figures 7 and 8. Pull your left hip back, pulling your left glutes away from the target, as your belt buckle is pulled over your left ankle.
Notice how the club grip works upwards with your left shoulder as the club is released, but the arc of the club head is still travelling slightly downwards through impact, brushing the ground after the ball, in front of your left foot – see Figure 7.
Note that you are not lifting your head through impact, your left shoulder (and the club grip) lifts because you are rotating and extending. The feeling is one of “turning out of the way of the shot” as you pivot around your left hip.
After moving through a great impact position (see Figure 7), continue to rotate, moving your upper body up and out into extension, your chest rotating to point somewhat towards the sky – see Figure 8.
If, like many golfers, you have a tendency to release the club early, this drill will expose that very clearly, you will feel like you want to get in a position similar to Figure 9.
Progressing
Once you are comfortable with your form, try hitting balls this way. Swing down into the release position (Figure 6), make sure your wrists are totally relaxed, pump the club up slightly to feel the lag and then release through impact. Repeat the drill without a ball 5 times, then strike another ball.
When you are ready, step away from the noodle and make three-quarter swings (see Golf Swing Drill 501 – Downswing: Great Ball Striking), in slow motion at first, striking balls while looking for the same sensations of lag and release. Drill 5 times, then make a normal swing, repeat, gradually building up speed.
Eventually, you will be able to make full swings at full speed with the noodle in place, starting in the takeaway position, but this is difficult to do without striking the noodle. Move a few inches further away from the noodle at first, and then slowly move closer to decrease the tolerance as your confidence improves.
Start with a mid-iron and then progress to longer clubs when you are proficient.
As with Part I, this drill should quickly help you to realise that the lag and release of the golf club is primarily a function of how you shift and rotate your pelvis, rather than how you use your arms and wrists.
Once again, you are building a strong sense of where your body needs to be before you release the golf club, and developing the correct feelings needed to deliver the golf club to the ball for great ball striking and amazing distance.
Work on this drill, together with the instruction provided in the downswing section and you will soon start striking the ball better and further than ever before!
Next up: we’ll help you to perfectly time your release, turning all of that lovely lag into club head speed through impact, in Golf Swing Lag and Release Timing – Part III.

