
This is a great drill for learning what a great golf downswing feels like, the correct sensations of lagging the golf club and then releasing that lag at precisely the right moment in order to generate Tour-calibre club head speed through impact. It will quickly highlight faults and help you to incorporate the correct movements into your own swing.
Most golfers have never felt the correct release movement, and the vast majority release the golf club too early, “casting” the club, because of a variety of swing faults – see Figure 1. This early release causes poor and inconsistent ball striking, adds loft to the golf club through impact, and results in a significant loss of distance and accuracy – see Figure 2.
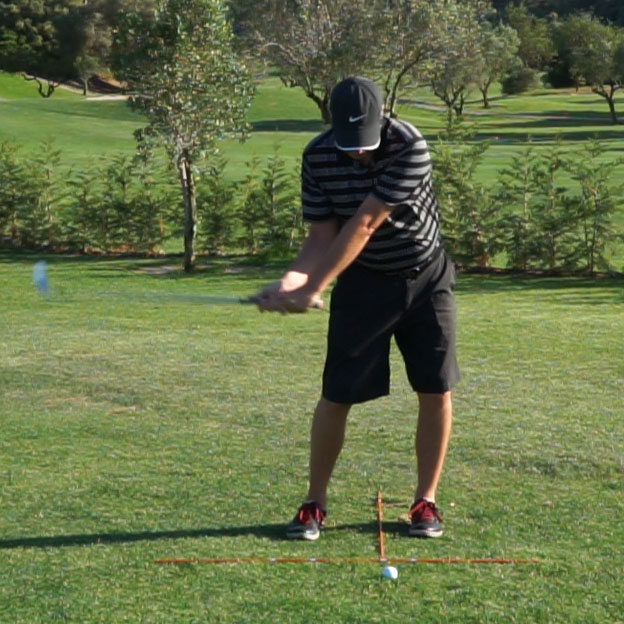
Figure 1. Early Release in the Downswing
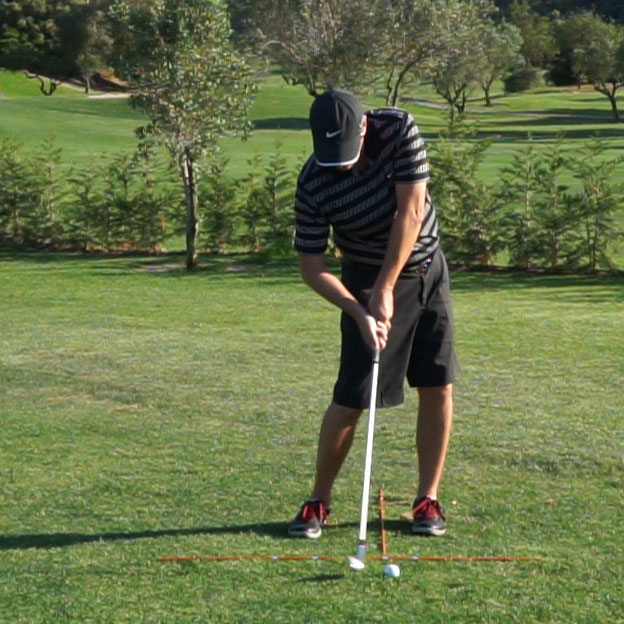
Figure 2. Early Release in the Downswing – Poor Impact
This series of drills is designed to supplement the instruction provided on this site, giving you new ways to feel the correct movements (detailed in the downswing section) and helping you to develop a deeper understanding of what needs to happen for you to deliver the golf club to the ball correctly.
The Drill
As always, apologies to our leftie friends, but for simplicity these instructions are given for the right handed golfer.
Setup Position
Start by creating your normal practice station with your setup and alignment sticks – see Golf Swing Drill 102 – Setup: Perfect Golf Stance Width and Ball Position.
Pierce a pool noodle with two alignment sticks and insert the sticks into the ground so that it forms a hurdle exactly one club length (start with a mid-iron) to the right of the golf ball position. The noodle should be suspended horizontally, perpendicular to your target line, at the height of your trouser pocket – see Figure 3, below.
If you don’t have a pool noodle, you could use the back of a chair or a golf bag, for example. Choose something that you don’t mind scratching up a little.
Place a ball just outside the normal ball position, so that you won’t strike it as you practise, and take your normal address position.
The Movement
Now lift the club so that you can rest it lightly on the noodle. You won’t be able to make your normal takeaway, the noodle will be in the way, but move into the correct takeaway position, lifting your hands slightly and turning your shoulders, keeping your arms straight and your left ear level with the back of the ball.
Hover the club shaft just above the noodle, keeping your wrists very soft and loose – see Figure 3.

Figure 3. Golf Swing Lag and Release Timing Drill 1: Setup

Figure 4. Golf Swing Lag and Release Timing Drill 1: Shift
Pull the butt of the club towards the target by shifting your hips towards the target as you pull your right elbow in front of your body, then rotating your hips, moving your belt buckle towards the target.
Keep pulling the club until the club head can drop past the noodle without striking it – see Figure 4.
At this point, the butt end of the golf club should be level with the left side of the golf ball. Your left hip socket should be level with, and just behind, your left heel, and your shoulders should be level. You will be in a “stacked” position over your firm left side, your ankle, knee, hip joint and left shoulder forming a vertical line from face on, ready to rotate around your left hip – see Figure 4.

Figure 5. Golf Swing Lag and Release Timing Drill 1: Release into Impact

Figure 6. Golf Swing Lag and Release Timing Drill 1: Follow-Through
Now release the club by turning through, your left shoulder moving back and upwards as it rotates around your tilted spine and your left leg straightens. Brush the grass in front of your left foot with the sole of the club, and continue to rotate, extending through as your belt buckle moves over your left ankle – see Figures 5 and 6.
Coaching Keys
Keep your left ear level with the back of the ball throughout – focus on keeping the tip of your nose in the same position relative to the golf ball.
Keep your left upper arm against your chest. You could comfortably hold a golf glove between the inside of your left biceps and your pecs without dropping it at any point in this movement – do this if you feel it helps.
The most common mistakes are trying to pull the golf club across by shifting your upper body to the left (see Figure 7), or by pulling your left arm away from your body (see Figure 8).
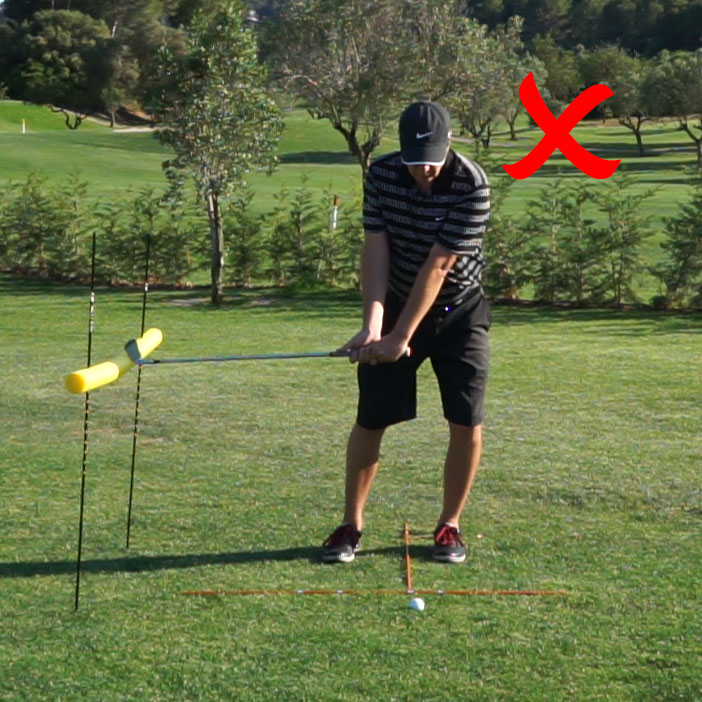
Figure 7. Golf Swing Lag and Release Timing Drill 1 Fault: Upper Body Shift

Figure 8. Golf Swing Lag and Release Timing Drill 1 Fault: Arm Away from Chest
Too Narrow?
The position in Figure 4, as you move into the release, will feel very “narrow” to most golfers. Maybe they’ve been taught that speed comes from width – the wider the arc, the faster the club head, no?
This concept is fundamental to understanding how a great golf swing works.
You should create width in the backswing, to help you get into a powerful position at the top and time the transition correctly, but then your downswing should be narrow, with the club head moving closer to your body – much like a figure skater pulling their arms in to speed up their rotation – while the butt end of the club stays the same distance from your chest throughout the golf swing, from address all the way until your arms relax and fold at the finish. This enables you to generate more rotational speed in your body, which equates to angular momentum, which equals energy.
This energy is then “thrown” outwards in the release, extending the club head into a wide position and thus generating enormous speed through impact.
A “wider” early downswing can’t create as much energy, and less energy in your rotation means less club head speed through impact. This is the amazing compound pendulum in action.
Progressing
Most golfers will probably find this movement unusual at first, and the release position very exaggerated.
Repeat the movement until start to feel confident, and then try hitting balls using the same movement. You won’t hit them very far, but you should find that you get into a great impact position – see Figure 5.
Also try making some slow motion full swings, being sure to miss the noodle, slowly picking up speed as your confidence grows.
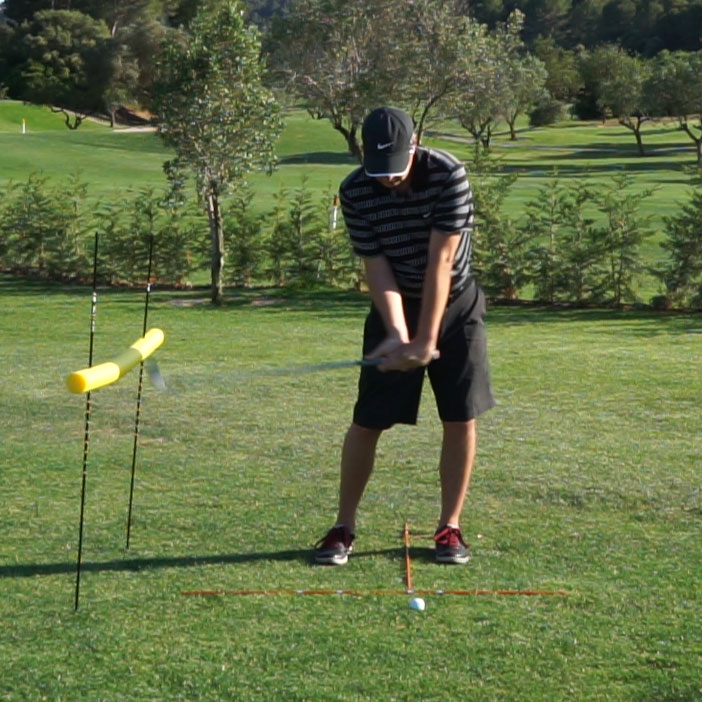
Figure 9. Golf Swing Lag and Release Timing Drill 1: Full Swing
When you feel ready, step away from the noodle and make some half- and three-quarter swings (see Golf Swing Drill 501 – Downswing: Great Ball Striking), hitting golf balls while you try to recreate the same feelings and slowly building up speed.
Keep returning to this drill, repeat 10 times to ingrain the correct feelings, then strike a few balls.
Eventually, you will be able to make full swings at full speed with the noodle in place, starting in the takeaway position, but this is difficult to do without striking the noodle. Move a few inches further away from the noodle at first, and then slowly move closer to decrease the tolerance as your confidence improves – see Figure 9.
Start with a mid-iron and then progress to longer clubs when you are proficient.
Spend some time on this drill and you should quickly start to realise that the lag and release of the golf club is primarily a function of how you shift and rotate your pelvis, rather than how you use your arms and wrists. For many golfers, this will be a true eureka moment!
Within a few minutes you will better understand how a great golf swing works, you will start building a strong sense of where your body needs to be before you release the golf club, and developing the correct feelings needed to deliver the golf club to the ball for great ball striking and amazing distance.
Work on this drill, together with the instruction provided in the downswing section and you will soon start striking the ball better and further than ever before!
Next up: we’ll help you to further develop the correct feelings of lag and release in a great golf swing, in Golf Swing Lag and Release Timing – Part II.


