
In this final part of the Lag and Release Timing series, we give you a simple but very effective drill for improving your golf swing timing and learning the sensations created by swinging a golf club in the most efficient and powerful way possible.
If you missed Part I, you can view it here, and to read Part II, click here.
Releasing the golf club, causing the angles between your forearms and the club shaft to increase as the club head accelerates out away from you, is one of the most important factors in a consistent and powerful golf swing.
Early Release
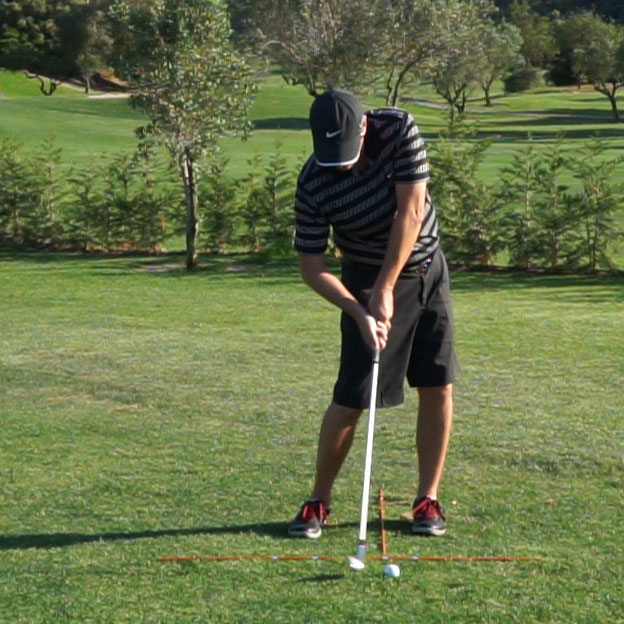
Figure 1. Early Release in the Downswing – Poor Impact
As we’ve discussed already in this series, the vast majority of golfers (even good ones) release the club too early, they “cast” the club, throwing away too much of the energy created by their golf swing before it can be delivered to the ball.
This early release creates an inefficient impact position where the club face is delivered to the ball with too much loft, the lead wrist is flexed (cupped), the lead arm is often bent, and the golfer is forced to try and rescue the shot with a weak, flippy action with their hands.
Golfers who release the club too early suffer from poor and inconsistent contact with the golf ball, no control over their ball flight, and loss of distance. This is especially true with the longer clubs.
Late Release
Other golfers have been taught that they should lag the golf club and their hands need to be ahead of the ball through impact, which is correct, but they overdo it, “holding off” the golf club and not releasing it early enough.
There is a common misconception (especially amongst better players) that you need to keep the hands forward for as long as possible. This is fine for a drill, where you are learning to exaggerate a late release in order to fix an early release, but this is not an efficient way to hit a golf ball!
All the lag in the world is useless unless the club is released early enough to create maximal club head speed through impact.
Early or late, if you don’t release the golf club at precisely the right moment then you won’t achieve the ideal impact position, you’ll lose distance, and your ball striking will suffer.
The Drill
As always, apologies to our leftie friends, but for simplicity these instructions are given for the right handed golfer.
Start with the same practice station that we used in Part I – with our setup sticks in place and a pool noodle “hurdle” exactly one club length behind the ball.
Place a ball in the normal ball position, then roll it directly towards the target. until it is just outside your left foot – see Figure 2, below.
Now take the club in your left hand and place an alignment stick in your fingers, along the right-hand side of the club grip, before completing your grip with your right hand. The alignment stick should be held in line with the club shaft, such that it extends beyond the shaft by about one club length – see Figure 2.
As before, lift the club so that you can rest it lightly on the noodle. You won’t be able to make your normal takeaway, the noodle will be in the way, but move into the correct takeaway position, lifting your hands slightly and turning your shoulders, keeping your arms straight and your left ear level with the back of the ball.
Make a three-quarter swing (see Golf Swing Drill 501 – Downswing: Great Ball Striking), in slow motion at first, and stop when the alignment stick strikes the left side of your torso – see Figures 2 to 4.

Figure 2. Golf Swing Lag and Release Timing Drill III: Top

Figure 3. Golf Swing Lag and Release Timing Drill III: Downswing

Figure 4. Golf Swing Lag and Release Timing Drill III: Impact
If you have released the golf club correctly, the club shaft will be pointing directly at the golf ball at this point – see Figure 4.
If you release the club too early, the club shaft will be pointing too far back – most golfers will find that it’s pointing outside their right foot, at first – see Figure 5.
Even better golfers will probably find that the club shaft is pointing too far back, they are not releasing the golf club as efficiently as possible. You may think that a swing that moves through the position in Figure 5 doesn’t look too bad, but this drill reveals that the release was too early.

Figure 5. Golf Swing Lag and Release Timing Drill III: Early Release

Figure 6. Golf Swing Lag and Release Timing Drill III: Late Release
And if you release the club too late, the club shaft will be pointing at a point on the target side of the ball, or the alignment stick won’t strike your body until way into the follow-through – see Figure 6.
Coaching Keys
Keep your left ear level with the back of the normal ball position throughout. Keep your wrists soft and relaxed.
As you swing back and through, the alignment stick and club shaft should be pointing towards the target line throughout.
As you begin to swing down, the end of the alignment stick should move out towards the pool noodle as you lag the golf club (Figure 2), before moving down towards the ground, and the club head should miss the noodle as you swing down – see Figure 3. If you struggle with this, see the Part I and Part II drills.
When the club head passes the noodle, the club shaft should be horizontal and the alignment stick should be pointing directly at the target – see Figure 3. Your shoulders should be level from face on.
You should feel the golf club fully accelerating as you extend through impact, your left shoulder and the club handle working upwards as the club head works down through the ball – see Figure 4.
Progressing
Once you are able to make fluid swings and consistently strike your torso with the alignment stick at precisely the moment, when the club shaft is pointing at the ball, then step away and hit a few golf balls.
Start with half and then three-quarter swings (see Golf Swing Drill 501 – Downswing: Great Ball Striking), in slow motion at first, trying to point the club shaft at the same point as the drill as the club head passes outside your left foot.
Gradually increase your swing speed, looking for the same sensations that you felt in the drill.
Use mirrors, a video camera and/or an impact bag to check your impact positions, from time to time.
Work on this drill, together with the instruction provided in the downswing section and you will quickly learn what a great golf swing feels like. After just a few sessions you’ll start striking the ball better, more accurately and further than ever before!


