
This is a simple drill that will help you to avoid early extension, losing the angles in your hips early in the downswing, which is a fault that destroys many an otherwise good golf swing.
We talk a lot, in the transition and downswing sections, about how to maintain your posture in the downswing, and about how losing posture is one of the main causes of poor and inconsistent ball striking, loss of power, and hitting the golf ball off line.

Figure 1. Early Extension – Trying to drop the club inside.
We also describe how losing posture is primarily caused by thrusting your pelvis forwards too early in the downswing, and not, as many golfers believe, by lifting your head. Your head will lift with early extension, but only in an effort to maintain your balance – the root cause of loss of posture is poor hip movement.
Even better golfers often suffer from early extension, usually because they have the wrong concept of how to use their lower body in the golf swing. They thrust their hips forwards in an attempt to rotate their pelvis hard and to drop the club under the plane to attack the ball more from the inside – see Figure 1. This problem gets worse with the longer clubs, where the golfer is trying to generate more power and the club is pulling them further off balance.
The result is that the golfer’s hands and club get “stuck” behind the trail hip and they have to try and rescue the shot with their hands, causing all manner of mishits and misdirected shots, blocks and pulls, seemingly at random!
This drill supplements the instruction given in the transition and downswing sections, giving you an alternative way to work on the problem and hopefully a better understanding of how your hips should work in a great golf swing.
The Drill
As always, apologies to our leftie friends, but for simplicity these instructions are given for the right handed golfer.
Start by sticking an alignment stick into the ground at an angle, such that when you address the golf ball the end of the stick will be just in front of the top of your right thigh – see Figure 2.

Figure 2. How to Stop Early Extension: Setup

Figure 3. How to Stop Early Extension: Top of Backswing
Now swing to the top, sitting deep into your right glutes and pushing down through your right heel. Maintain the flex in your right knee, your right hip working away from the alignment stick as your pelvis rotates – see Figure 3.
From the top, make your transition, shifting to the left and sitting into your left glutes, pushing down through your left heel. Feel like you are pulling your belt buckle behind you, away from the ball.
As you move down from the top, feel he angles in your body increase, your hips moving more into flexion – see Figure 4. Feel your chest working down, facing more towards the target line behind the ball, as you pull your hips back to increase the distance between your right thigh and the alignment stick.

Figure 4. How to Stop Early Extension: Downswing

Figure 5. How to Stop Early Extension: Follow-Through
Make a few rehearsal swings, really exaggerating the feelings of pulling your hips back and dropping your chest. If you are used to extending your hips too early then even a tiny increase in flexion here will feel huge! Remember that, when learning the golf swing, feel is not real.
If you think you’re doing it enough, it’s never nearly enough!
Notice how far you have to pull your hips back to stay on the tush line – it probably feels like much further than you realised.
You will also feel how keeping your pelvis back will roll your right foot onto the inside of your shoe in the downswing, rather than pulling your heel off the ground as your knee is pulled forwards by your hip.
Now hit some balls, looking for the same feelings.
If you extend your hips too early, your right thigh will strike the alignment stick on the way down, and your chest will face more upwards through impact.
Get it right, and you will be able to shift left and keep your pelvis back long enough to avoid the alignment stick – your right thigh will pass to the left of the stick as it is pulled forwards by your rotation – see Figure 5. You will feel much more like you are “covering the shot” with your chest through impact.
Extending Through Impact
This drill will also help you to identify another common fault that we see – golfers not extending through impact.
Golfers with this fault often shift left reasonably well at the start of the downswing, but then pull their left hip away from the target as they rotate – see Figure 6 – and they don’t get into the ideal “stacked” impact position over their left side through impact.
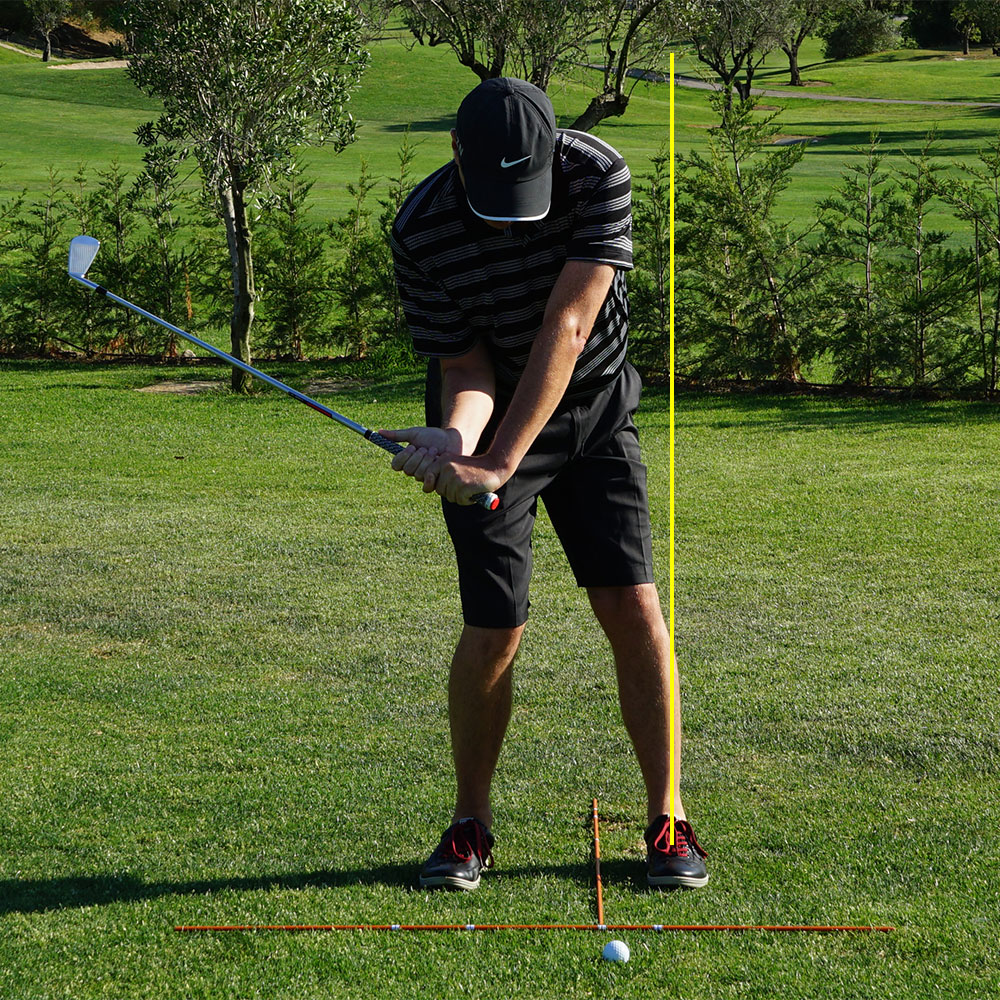
Figure 6. Rotating Pelvis Away from Target
The result is poor and inconsistent ball striking and loss of power. You can’t deliver the club to the ball very effectively from the position in Figure 6.
While you should avoid extending too early, you must extend through impact in order to turn through safely and powerfully.
Extend your hips as you pass impact, thrusting your belt buckle towards the target and contracting your left glutes as your pelvis moves from anterior tilt (the front of your pelvis lower than the back) at impact to a more neutral, level, position in the follow-through – see Figure 5.
If your hips stay in flexion beyond impact, you can’t turn through into your finish safely, you will be forced to turn more with your spine, which is why 80% of weekend golfers suffer from issues with the lower right side of their backs.
This move will also cause your right thigh to strike the stick in the follow-through, because you didn’t stay left as you turned your pelvis through.
Progressing
Keep repeating the drill, then hitting some shots looking for the same feelings. Slowly pick up the pace and work up to longer clubs as your confidence increases.
If you are practising at home, or somewhere where you can’t push a stick into the ground, it’s quite easy to devise an equivalent practice station. Use mirrors and video, too, when you can, to check how well you maintain your angles and stay on the tush line and head line.
Work on this drill, together with the instruction provided in the transition and downswing sections and you will quickly start to better understand what a great golf swing feels like. After just a few sessions you’ll start striking the ball better, more accurately and further than ever before!


