Keeping your neck flexible and relaxed during the golf swing is crucial for making a full turn while keeping your eyes on the golf ball. The Neck Stretch Exercise is a great stretch that will prepare the muscles and tendons of your neck before you play golf, hit the practice range, or undertake other physical exercise. It can also be performed after playing golf to maintain mobility, alleviate soreness, relieve tension and make your muscles feel better.
The Neck Stretch Exercise forms part of the Golf Recovery & Regeneration series of innovative and dynamic exercises that will help to improve the health and quality of your muscle tissues and joints, helping you to perform better on and off the course.
The Neck Stretch Exercise is a component of the Golf Loopy Perfect Warm Up, an exercise routine that has been scientifically designed to prepare your mind and body for playing golf to the best of your ability in just 7 minutes.
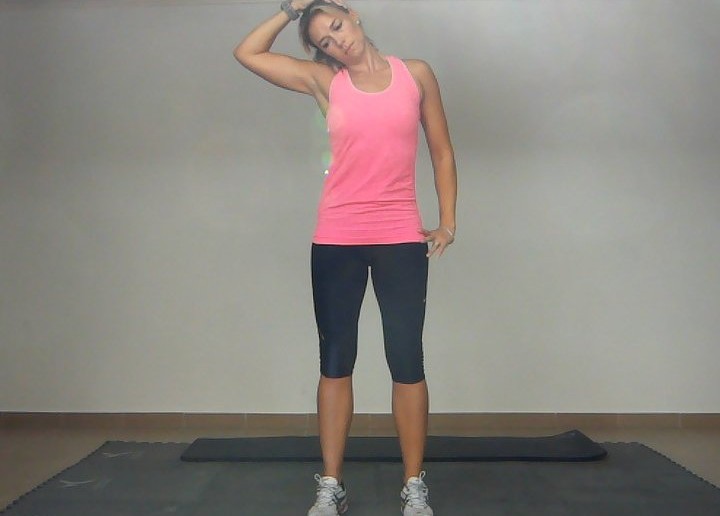
Figure 1. Neck Stretch Exercise Video.
Steps
- Start by standing tall in good posture, your feet hip-width apart, toes pointing forward or turned slightly outward; arms by your sides. Engage your abdominal muscles to stabilise your spine. Pull your shoulder blades down and back. Do not allow your lower back to arch.
Part 1: Neck Flexion and Rotation I
- Slowly lower your chin toward your chest (neck flexion), think of making a ‘double-chin’ by pressing your chin directly into your neck.
- Hold for 1 deep breath, in and out, allowing the tension to release.
- Slowly roll your chin out to your right, over your collar bone, then lifting it as you turn until you are facing directly to your right.
- Hold for 1 deep breath, in and out, and allow the tension to release.
- Now slowly roll your chin down and out to your left, over your collar bones, then lifting it as you turn over your left shoulder until you are facing directly to your left.
- Hold for 1 deep breath, in and out, allow the tension to release, and slowly return to the starting position.
Part 2: Neck Extension and Flexion
- Slowly bring the base of your skull toward your back (neck extension), brining your chip up toward the ceiling. Make sure to keep your shoulders relaxed, down and back.
- Hold for 1 deep breath, in and out, allow the tension to release, and slowly return to the starting position.
- Slowly flex your neck again, lowering your chin toward your chest, think of making a ‘double-chin’ by pressing your chin directly into your neck. This time increase the stretch by bringing your hands behind your head and placing your fingertips right above the base of the skull. Apply light pressure forwards with your fingers.
- Hold for 1 deep breath, in and out, allow the tension to release, and slowly return to the starting position.
Part 3: Lateral Neck Flexion
- Slowly bring your right ear towards your right shoulder, stopping when you feel the stretch. Be sure to maintain body alignment keeping your shoulders down and back.
- Increase the stretch by bringing your right hand to the top of your head and gently applying a light pressure with your fingertips.
- Hold the stretch 1 deep breath, in and out, allowing the tension to release.
- To stretch the sternocleidomastoid (SCM), slowly lift your chin upwards.
- Slowly return to the starting position and repeat Part 3 on your left side.
Part 4: Neck Flexion and Rotation II
- Slowly lower your chin toward your chest (neck flexion) once more.
- Increase the stretch by bringing your hands behind your head and placing your fingertips right above the base of the skull. Apply light pressure forwards with your fingers.
- Hold for 1 deep breath, in and out, allow the tension to release, and slowly return to the starting position.
- Turn your head to your left until it’s in line with your left shoulder. Do not tilt your head, just rotate it.
- Increase the stretch by applying gentle pressure against your cheek with your hand. Keep both shoulder blades down and back.
- Hold for 1 deep breath, in and out, and allow the tension to release.
Move into each position in a slow and controlled manner. Avoid any movement of your shoulders.
Perform this exercise as part of the Golf Loopy Perfect Warm Up routine, as well as after playing or practising golf, to maintain mobility, alleviate soreness, relieve tension and make your muscles feel better.
If you have any questions or comments about this or other articles on Golf Loopy, please send us an email.
You May Also Like…
Golf Performance Programmes – the most effective golf-specific fitness regimens on the planet, guaranteed to make you a better golfer!
There are a number of other golf-specific recovery and regeneration exercises in the Golf Loopy Train like a Champion System.
The Golf Loopy Perfect Warm Up, an exercise routine that has been scientifically designed to prepare your mind and body for playing golf to the best of your ability in just 7 minutes.
Introduction to the Swing like a Champion System.
Golf Anatomy and Kinesiology, a collection of articles describing the roles of the muscles involved in the golf swing.


