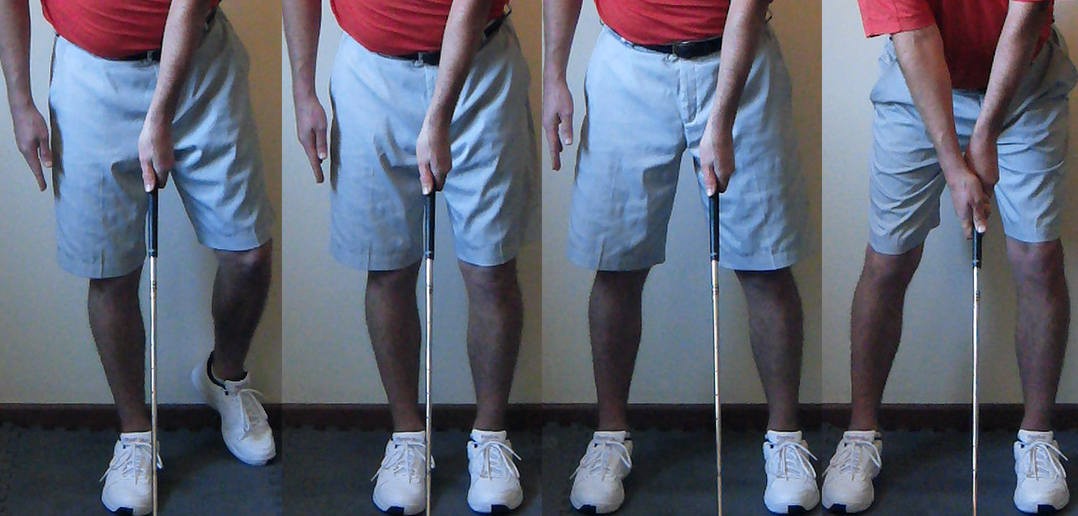
You could argue that it doesn’t much matter which order you address the golf ball in, as long as you achieve the perfect posture and alignment required to play the right shot.
That has some truth, but, as we discussed in Golf Swing 107- Setup: Perfect Golf Aim and Alignment, your pre-shot routine is about much more than getting your body in the correct position, it’s about course management and mental preparation for your swing, too.
And once you have chosen your target, having a set routine for stepping into your shot and addressing the golf ball will help you to achieve the perfect posture and alignment you need without having to think about it too much, and so keep The Learner in his box.
Unlike the other articles presented in the Swing like a Champion system, the specific order of the steps in this drill is not based purely on scientific principles, but the learning process certainly is. The order of the movements is based on our experience of what works best, based on the requirements of the Swing like a Champion system. We strongly recommend that you follow the sequence described here when addressing the golf ball. It will give you the best chance of setting up correctly and playing a great golf shot.
If you want to modify this sequence for your own pre-shot routine, that’s fine, but you should understand how each of the steps works, and try to incorporate each of them in your own routine.
This drill draws upon the knowledge presented in all of the previous articles in the full swing setup section of the Swing like a Champion system, and incorporates elements of all of the drills presented there. To perform this drill correctly, you should be familiar with all of those drills, and you should be able to perform them with reasonable proficiency — getting them perfect 4 out of 5 times.
The drills in the Swing like a Champion system are presented in a scientifically designed sequence that will enable you to learn as quickly as possible, taking shortcuts will disrupt that sequence and slow you down. It’s all about building the neural pathways that you need in order to perform the perfect golf swing, increasing your skill levels, even when it might feel like you’re not making much progress. If you follow the sequence and perform the drills correctly, you’ll be learning even while you sleep.
Once again, apologies to the lefties, for simplicity these instructions are given for a right-handed golfer.
The Drill
When practising addressing the golf ball, you should have a precise target in mind — you’ll never hit the ball on the course aimlessly, so don’t practise aimlessly. Even when practising indoors, pick a target, preferably one that you can see through a window, so it’s not too close.
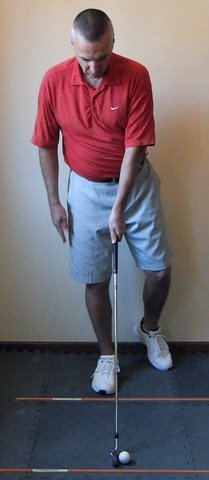
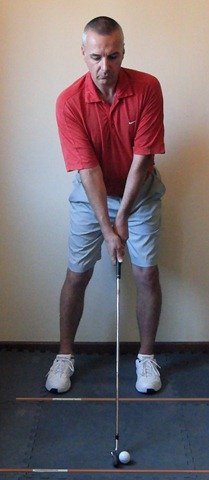
Put a golf ball on the ground, and place 2 golf clubs (or alignment sticks, if you have them) on the ground — one just in front of your feet at address, and one a couple of inches (5cm) on the other side of the golf ball. Make sure that both clubs are perfectly parallel to your target line — see Figure 1.
Now place a tee (or a small coin when indoors) about 1 or 2 yards (1-2m) ahead of the ball, exactly on the target line. This will be your intermediate target, as described in Golf Swing 107 – Setup: Perfect Golf Aim and Alignment. You will always use an intermediate target when you play a golf shot, so use one when you practise.
Before you approach the golf ball, take a golf club in your left hand, with your perfect left hand grip.
Aligning the club face square to your target is crucial, and your left hand has primary responsibility for the face angle at impact.
You need to build your stance around a club face that is square to the target line, and not adjust your club face to suit an incorrect alignment.
Now you are ready to address the golf ball:
- With your club in your left hand, start your address by placing your club behind the ball, with the club shaft perpendicular to the target line (vertical when viewed from face on) and the club face perfectly square to the target line. Use the golf club behind the ball to help you with this, but as you work on this drill you should learn to rely more on your intermediate target, and take a glance or two at your real target, also.
- Step into the shot with your right foot first. Place your right heel exactly level with the back of the golf ball, perpendicular to the target line — see Figure 1. As you practise, you will get a feel for exactly how far from the ball your foot should be.
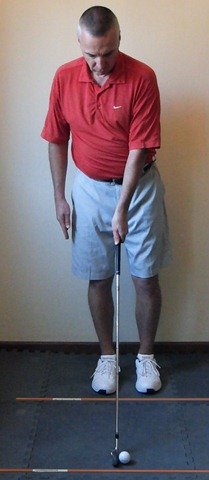
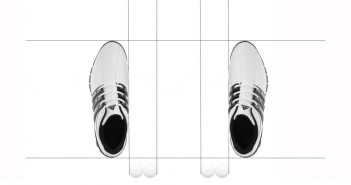
- Place your left foot next to your right, your heels precisely 2 golf balls apart– see Figure 2. This will set the back of the ball exactly 2 golf balls behind your left heel, every time, which is the perfect golf ball position — the relative positions of your left foot and the golf ball are key, your left foot determines the position of the bottom of your swing arc, since you will be over your left side at impact.
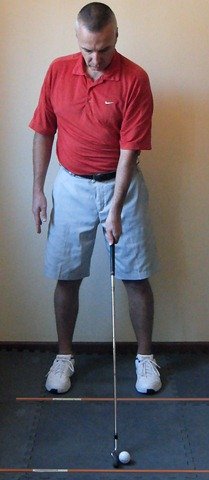
- Now step to the right with your right foot, adopting the perfect stance width — see Figure 3. If you have been working on Golf Swing Drill 102 – Setup: Perfect Golf Stance Width and Ball Position, the perfect stance width should soon feel natural — if you’re not quite there yet, then keep working on it separately, and then start to incorporate it into this drill. Ensure that your feet are aligned parallel to the target line — use the club in front of your feet as a guide at first, but learn to rely more on your intermediate target, visualising the target line correctly is a skill that you are learning as part of this drill.
- Now take your perfect right hand grip, with the club held in front of you, arms bent, as described in Golf Swing Drill 104 – Setup: Taking Your Perfect Golf Grip.
- Make sure that you are in perfect posture, with your shoulders connected and your core activated, you should feel poised and athletic.
- Adopt your perfect spine angle, hinging at your hips, to place the golf club behind the ball — see Figure 4. If you have been working on Golf Swing Drill 103 – Setup: Perfect Golf Spine Angle, the perfect spine angle should soon feel natural — if you’re not quite there yet, then keep working on it separately, and then start to incorporate it into this drill.
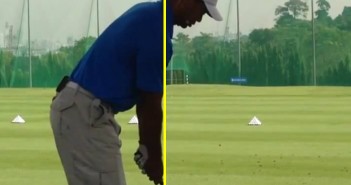
- Tilt your spine away from the target by shifting your hips one golf ball to the left, keeping your head still, as described in Golf Swing Drill 105 – Setup: Spine Tilt at Address. As you do this, make sure that your hips and shoulders stay parallel to the target line.
- Make sure that, as described in Golf Swing 106 – Setup: Distance from the Golf Ball and Arm Position, your arms are positioned correctly. Your right arm should be externally rotated. Your arms should be hanging, free of tension, under your shoulders. And you are the perfect distance from the golf ball; that the ball is directly in front of the sweet spot on the club face. If you are too close to, or far from, the ball then step away and start again, until you get a feel for it.
- Be sure that your weight is distributed evenly between the inside-front of your ankles, as described in Golf Swing 102c – Setup: The Perfect Golf Weight Distribution and Balance. You should feel anchored to the ground, solid, balanced, and stable.
- Your feet, knees, thighs, hips, arms, shoulders, and eyes, as well as the club face, should all be aligned parallel to the target line. Again, use the alignment clubs on the ground as a guide at first, but learn to rely more on your intermediate target as you progress.
- Glance again at your target and the intermediate target, then square your eyes again. Really focus on what being properly aligned feels like.
Practise Deliberately
Remember what we discussed you about how your mind learns, in How to Learn a Great Golf Swing. When you practise this drill, use deliberate practice, find somewhere where you will be undisturbed, and really focus.
Repeat this drill as often as you can, for at least 5 minutes once a day for a month, and then regularly thereafter. Incorporate it into each and every practice session you ever have from now on.
You can perform this drill with any club. We like to use a 6-iron for most of our practice sessions. But, over time, you should work to perfect the drill with every club in the bag.
Work in front of a mirror as much as possible, from both face on and down the line. Also use a video camera as often as you can, and check every aspect of your position very carefully, as described in the previous drills.
Pause to feel if you’ve got it right before you look in the mirror. If it doesn’t feel right before you look in the mirror, estimate the error. If you didn’t get it exactly right, how is it different from the perfect position, and what does the error feel like?
Each time you perform the drill, do it from the beginning, by stepping away from the ball and taking your left hand grip afresh. You are working on the whole sequence, and on visualising your target line, and to do that effectively you must start by aligning the club correctly in your left hand, and then stepping up to the ball.
If you make mistakes, if anything isn’t perfect, then pause to consider. How does the error feel? Correct your position, how does that feel different? Now step away and start again. You will learn more quickly if you make mistakes and fully acknowledge them, be keenly aware of each element of your body, and think hard about where you went wrong.
If you are too far from the golf ball, don’t just shuffle your feet to correct it. Making slight adjustments that way is fine when you are out on the golf course, but when you are learning you should strive for perfection on the first attempt, which will make your mistakes, and the causes of them, more obvious.
Progressing
As this address position becomes more natural, the feel, the feedback from your developing proprioception will change, so work through the drill again and again, in brief highly focussed sessions. Step away regularly and shake yourself down, release any tension, then take your stance afresh, never just repeat drills mindlessly — it is not just about getting in the reps.
You should be constantly reaching, performing the drill more naturally, with less thought, as you perfect it. If you start to make too many mistakes then slow down, if necessary step back to the drill that will fix those errors and work forward again from there. If you spot an error in your basic posture, go right back to Golf Swing Drill 101 – Setup: Perfect Posture and Connecting to Your Core, work through it until you’ve identified and corrected the source of the error, practise fixing it, then build up again slowly, one drill at a time, making sure that the error doesn’t reappear or lead to other mistakes. You’ll have to repeat this process many times, but you’re constantly building those neural pathways, increasing your skill levels, even when you don’t feel like you’re making much progress.
Once you are confident, perform the drill without the alignment clubs or sticks on the ground. Use a video camera and check your position and alignment carefully. Place your club along your toe line and step behind it to check that your toes were perfectly aligned parallel to the target line. No matter how proficient you are, however, you should still use alignment clubs, or sticks, most of the time.
You should get in the habit of checking your setup and alignment every time you practise.
Don’t neglect the previous drills, even when you are proficient with them. Continue to perform them individually, and to incorporate them them into this drill. They are a vital part of the foundation you are building, one drill on top of the last, for a truly great golf swing.
It is easy for small errors to creep in, if you don’t look for them, and undiscovered errors are quickly compounded, ruining your swing — every time you practise or play with, say, a small error in your grip, you are unconsciously practising how best to perform that error, ingraining it and all of the damaging compensations and manipulations that it causes.
After about a month of performing this drill, you should find that you address the golf ball perfectly, without thinking about it. You should soon start to feel uncomfortable addressing the golf ball any other way, even small mistakes should feel “wrong”. Keep performing the drill daily until you get to that stage.
The best golfers in the world check their basic setup very regularly, so should you.
If you have any questions or comments about this or other articles on Golf Loopy, please send us an email.
This setup position is the same for every golf club when making a full swing. The driver is a special case, and is discussed next in Golf Swing 109 – Setup: How to Set Up for the Driver in the Golf Swing.
Okay, you’re set up perfectly over the golf ball and ready to pull the trigger? Let’s start learning how to move, with Golf Swing 201 – Takeaway: The Perfect Golf Swing Takeaway.

